
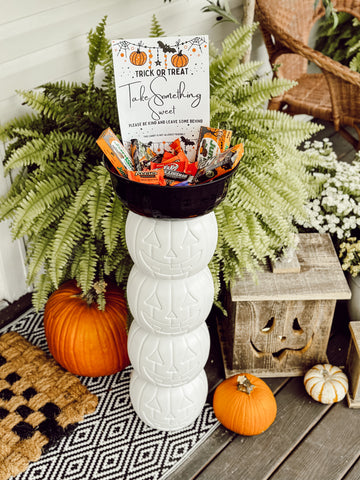
Looking for a way to add fun and whimsy to your porch for Trick or Treating? This Trick or Treat Stand is their perfect way to make everyone feel welcome! How fun would it be to leave this out the week of Halloween for mailmen, delivery drivers and visitors! These iconic symbols of Halloween evoke childhood memories and carry an irresistible charm! So let’s get started DIYing these plastic Jack-O-Lanterns into an adorable stand!

What You'll Need:
- 4 Plastic Jack-O-Lanterns
- 1 plastic bucket or basket
- White Flat Spray Paint
- White Caulk or silicone
- Hot glue or super glue
- Yummy candy
- Printable Card ( You can access my free printables collection here. If you’re not a subscriber, you’ll receive an email with the password when you subscribe here. I have both an Allergy friendly and Non-Allergy friendly version of the Printable available.)
Step 1: Remove handles
Start by removing the handles from the plastic jack-o-lanterns. You won't need them for this project, so feel free to discard. I used wire cutters to easily remove the handles. Scissors will work just as well.
Step 2: Silicone or tape holes (Optional)
Next, use white caulk or silicone to seal the holes in the jack-o-lanterns left by the handles. Alternatively, you can use tape to cover the holes if you don't have caulk or silicone on hand.
Step 3: Spray paint jack-o-lanterns
Now it's time to get creative! Grab your spray paint and give the jack-o-lanterns a fresh coat. This will give them a clean and uniform look. I used white paint (of course) but feel free to let your creativity shine with your favorite color!
Step 4: Let Dry
Allow the spray paint to dry completely before moving on to the next step. This usually takes about an hour, but it's always best to check the instructions on the paint can.
Step 5: Glue Jack-O-Lanterns together
Before gluing, add rocks or pieces of cement or bricks inside the bottom jack-o-lantern to keep the tower stable. Using hot glue or super glue, carefully stack the jack-o-lanterns on top of each other to create a tower. Make sure they are securely attached to one another.
Step 6: Place bucket or basket on top
Take your plastic bucket or basket and place it on top of the stacked jack-o-lanterns. Gluing the bucket is optional. If you don't glue the bowl to the tower, you will have the ability to take the candy inside if you want to use it for more than one day. What a perfect way to treat mailmen, delivery drivers and visitors the week of Halloween!
Step 7: Print Trick or Treat Printable on Cardstock and add to bucket
For the finishing touch, print out my “Trick or Treat" printable on cardstock and attach it to the bucket or basket. This will let everyone know they are free to help themselves!

Now you have a unique DIY trick or treat stand made from simple plastic jack-o-lanterns. Fill it up with yummy candy and get ready to delight all the trick-or-treaters that come your way! Remember, Halloween is all about having fun and getting creative, so don't be afraid to add your own personal touches to this project.

I’ve created a short video of the process with some up close views on Instagram that you can see here. I’d love to see your projects and creations! Feel free to send me a DM or an email with your photos or videos! Happy Halloween Friends!

Please note***This post contains affiliate links. If you make a purchase via one of these links I may receive a small commission from your purchase. This commission does not add any cost to you but helps me to continue to share new products, companies and ideas with you. Thank y'all for always being so supportive!!