
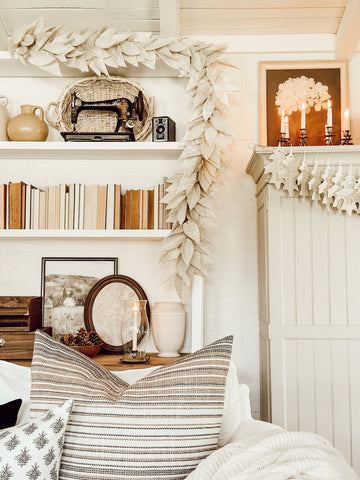
Effortlessly Add Fall Charm to Your Home with this affordable Book Page Leaf Garland!
What Supplies Do You Need?

To create a beautiful book page leaf garland, you'll need the following supplies:
- Book pages
- Hot glue gun and glue sticks
- Silicone Finger Protectors
- Leaf pattern
- Grapevine Wire
What's the Process?
Now that you have all your supplies ready, let's dive into the step-by-step process:
Step 1: Cut out the Leaves
Grab those book pages and start cutting out leaf shapes. You can use my leaf template as a guide or get creative and make your own unique leaf shapes. Remember, this is your chance to show off your artistic skills!
**You can access the printable for my leaf template by subscribing to my email list here. Once subscribed, an email will be sent to you will the password for the entire free printable collection!

Step 2: Fold the Leaves in Half
Take each leaf you've cut out and fold it in half. This will give your garland a more realistic and three-dimensional look. Plus, it adds a touch of elegance and realism to the leaves!
Step 3: Glue the Leaves
Now it's time to bring those leaves to life! Apply some hot glue at the base of each leaf and press it together to hold the folded position as shown below on the leaves on the left. This also adds another layer of depth to the leaves.

Step 4: Attach the Leaves to the Grapevine Wire
Grab your grapevine wire and start attaching the leaves! Apply some hot glue to the back of each leaf's stem and wrap it around the grapevine wire. This will secure the leaves and create a beautiful garland that you can hang anywhere!


The silicone finger protectors came in super handy for this step to prevent finger burns with the hot glue!

Step 5: Add Dimension
To add fullness and depth to your garland, alternate between folded leaves and flat leaves. This will give your garland a sense of depth and dimension. It's like creating a mini forest that's ready to be displayed!

Step 6: Hang and Enjoy
Now that your book page leaf garland is complete, it's time to find the perfect spot to hang it. Whether it's in your living room, bedroom, or even outdoors, this garland will add a touch of whimsy and creativity to any space. Sit back, relax, and enjoy the beauty of your handmade masterpiece!

I also created this simple oak leaf book page garland last year that you can pair with this garland for a completed look! You can access the blog post for that garland here.

Remember, crafting is all about having fun and letting your creativity shine. So go ahead, gather your supplies, and embark on this delightful book page leaf garland adventure. Happy crafting!

Please note***This post contains affiliate links. If you make a purchase via one of these links I may receive a small commission from your purchase. This commission does not add any cost to you but helps me to continue to share new products, companies and ideas with you. Thank y'all for always being so supportive!!