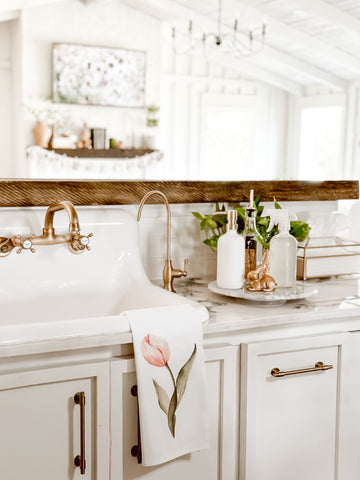
Please note***This post contains affiliate links. If you make a purchase via one of these links I may receive a small commission from your purchase. This commission does not add any cost to you but helps me to continue to share new products and ideas with you. Thank y'all for always being so supportive!!
Looking for a fun and creative way to decorate your home for Spring? Look no further! This fun and easy project will have you hopping with excitement as you craft your very own adorable bunny-shaped board. Follow these simple steps to bring a bit of bunny magic into your space.
First things first, you'll need to find a bunny template. Subscribers can download my template here. If you'd like to get access to my entire printable collection, you can subscribe here. Once you've found the perfect shape, go ahead and print it out. Carefully cut out the bunny shape, making sure to get those curves just right.
Next, grab a piece of wood that's ready to be transformed into a bunny board. Place your bunny template on the wood and trace around it with a pencil. Make sure to press down firmly to get a clear outline.
Now comes the fun part - cutting out your bunny shape! Grab protective gear and a jig saw (or any other cutting tool you have on hand) and carefully cut along the traced lines. Take your time and watch those bunny ears come to life!
Once your bunny shape is cut out, it's time to smooth things over. Grab an orbital sander with 120 grit sandpaper and gently sand the edges and surface of your bunny board. This will give it a nice, polished finish and ensure no splinters hop up unexpectedly.
Finally, it's time to add the finishing touch to your bunny board. You can choose to stain it for a rustic look or seal it to keep it looking fresh and new. I chose to use Fusion Mineral Paint Stain and Finishing Oil in the color Cappuccino for a dark brown contrasting color. This finishing oil goes on super quick and dried within a few hours. Beeswax and Hemp Oil are also other finish options that will enhance the natural pine color and are nontoxic. Whichever option you choose, make sure to let it dry completely before displaying your bunny masterpiece.
If you’d like to see a full length video tutorial of the process on Facebook, you can check it out here or you can watch a quick Instagram Reel here. Happy Bunny Board Making Y'all!
If you love this piece but don't have the option to DIY it, you can BUY it! My friend Jennifer from Birchlane by Jennifer is selling her handmade version of this centerpiece. You can head to her website and purchase one of her beautiful creations here.
]]>
Please note***This post contains affiliate links. If you make a purchase via one of these links I may receive a small commission from your purchase. This commission does not add any cost to you but helps me to continue to share new products and ideas with you. Thank y'all for always being so supportive!! You can find all of the links for the post by clicking here.
To create this mouthwatering masterpiece, you'll need a few key ingredients:
Now that you have your ingredients ready, let's dive into the process of creating this chocolatey delight!
Start by following the instructions on the Triple Chocolate Cake Mix box. Mix the batter, pour it into a greased cake pan, and bake it to perfection. I prefer to use Baker's Joy for specialty pans. It's the best at preventing sticking with intricate pans!
Once the cake is out of the oven, resist the temptation to dive in right away. Allow it to cool completely before moving on to the next step. Once cooled, gently remove from pan. You may need to gently unstick areas with a blunt object like a butter knife or wood spatula.
Now comes the fun part! Spread a generous amount of Cool Whip or whipped topping on top creating a fluffy and creamy foundation for the raspberries.
Next, scatter a cup of fresh raspberries over the whipped topping. The burst of tartness from the raspberries will perfectly complement the rich chocolate, creating a burst of flavors in every bite.
Using a vegetable peeler, shave a bar of chocolate. You may need to slightly soften the chocolate in the microwave for a few seconds to get those gorgeous spiral curls of chocolate. Sprinkle the shaved chocolate on top for an added touch of elegance and a delightful crunch.
And that's it! You've successfully created a Chocolate Raspberry Cake that is sure to impress. Now, all that's left to do is grab a fork, take a bite, and enjoy the explosion of flavors on your palate. Indulge in the decadence and savor each mouthful of this chocolatey delight.
So, whether you're celebrating a special occasion or simply want to satisfy your chocolate cravings, this Chocolate Raspberry Cake is the ultimate treat. With its rich chocolatey flavors, creamy whipped topping, and bursts of tangy raspberries, it's a dessert that will leave you wanting more. So go ahead, treat yourself and your loved ones to a slice of pure bliss!
If you’d like to see a full length video tutorial of the process on Facebook, you can check it out here or you can watch a quick Instagram Reel here. Happy baking ya'll!
]]>
Looking for a fun, calorie free gift for Valentine’s Day?
Coconut oil salt scrub is a natural skincare and self-care product that harnesses the many benefits of its core ingredients. First, we will explore the virtues of coconut oil and Epsom salt, two components celebrated for their health and beauty benefits, and guide you through the simple steps to craft this luxurious scrub. And with Valentine’s Day around the corner, this scrub serves as a thoughtful, handmade gift that offers a loving escape from the usual candy or chocolate, embracing wellness and care.
Please note***This post contains affiliate links. If you make a purchase via one of these links I may receive a small commission from your purchase. This commission does not add any cost to you but helps me to continue to share new products and ideas with you. Thank y'all for always being so supportive!! You can find all of the links for the post by clicking here.
The Benefits of Coconut Oil
Coconut oil has long been revered for its extensive benefits, both in culinary and cosmetic realms. Its unique composition of fatty acids, primarily lauric acid, contributes to its antimicrobial, anti-inflammatory, and antifungal properties, making it a powerhouse for skin health. When applied topically, coconut oil can help moisturize the skin deeply, thanks to its ability to penetrate quickly and effectively. This is because the medium-chain fatty acids (MCFAs) in coconut oil are similar in structure to the natural oils produced by our skin, allowing it to reinforce the skin’s lipid barrier, enhancing moisture retention, and providing a smooth, supple texture. I prefer to use Extra Virgin Coconut Oil for the milder coconut scent but that’s just a personal preference.
Moreover, the antioxidant properties of coconut oil play a crucial role in protecting the skin against harmful free radicals, potentially reducing the signs of aging. Its soothing properties also make it an excellent ingredient for calming irritations and reducing the appearance of redness, providing a natural glow to the skin.
The Benefits of Epsom Salt
Epsom salt, named after the bitter saline spring at Epsom in Surrey, England, is not actually salt but a naturally occurring pure mineral compound of magnesium and sulfate. These minerals have powerful health benefits that can enhance the body’s natural detoxification processes and soothe the muscular system. Magnesium, in particular, is known for its ability to relax muscles, reduce inflammation, and help maintain normal nerve and muscle function. When used in a scrub, Epsom salt gently exfoliates the skin, removing dead skin cells and promoting cell turnover, leading to softer, brighter skin.
The sulfate in Epsom salt aids in flushing toxins and heavy metals from the cells, easing muscle pain, and helping the body to eliminate harmful substances. Its exfoliating properties not only smooth and soften the skin but can also help to cleanse the pores and clarify the skin’s texture.
A Handmade Gift for Valentine’s Day
In a world where Valentine’s Day often gravitates to sweets and treats, a homemade coconut oil salt scrub offers a refreshing alternative! It’s also a gift with a personal touch! Crafting this scrub yourself adds a layer of thoughtfulness and intention to your gift, while promoting health and relaxation for those you love. Packaged in a beautiful glass jar and possibly adorned with a ribbon or personalized label, it becomes a special keepsake that reminds your loved one of the care and effort you put into their gift.
How to Make Your Coconut Oil Epsom Salt Scrub
Supplies Needed:
**The ratio of 1 cup Coconut Oil to 1/2 cup Epson Salt can be multiplied to make a larger batch. I tripled the recipe for this quart jar.
Step 1: Measure Coconut Oil and Soften as Needed
Begin by measuring out 1 cup of extra virgin coconut oil. If the oil is solid (as it often is at room temperature or in cooler climates), gently soften it without melting it completely. This can be done by placing the coconut oil in a warm spot or using a double boiler method on a very low heat for a short period. The coconut oil should be a soft consistency that's easily pliable when rubbed between your fingers, but not liquid or runny.
Step 2: Add Epsom Salt
Incorporate 1/2 cup of Epsom salt into the softened coconut oil. The granularity of Epsom salt is perfect for exfoliation, not too harsh but effective enough to polish away dead skin cells.
Step 3: Mix Thoroughly
Stir the mixture thoroughly to ensure that the coconut oil and Epsom salt are well combined. The goal is to achieve a homogeneous consistency that will be easy to apply and use on the skin.
Step 4: Add Essential Oils
For an added touch of luxury and personalization, incorporate a few drops of your favorite essential oils into the mixture. Essential oils not only add a delightful fragrance but can also offer additional therapeutic benefits, such as relaxation, calmness, or soothing, depending on the oils chosen.
After completing these steps, transfer the scrub into a glass jar, securing it tightly to maintain its freshness. This glass Ball quart jar makes a great gift of its own and can be used well after the salt scrub is all used. Adding a beautiful ribbon with a personalized note will make it even more special!
Crafting a homemade coconut oil Epsom salt scrub is a simple yet profound way to embrace natural skincare. Presenting this scrub as a handmade gift for Valentine’s Day elevates the gesture to more than just a token of affection; it becomes an emblem of care, wellness, and personal well-being.
In a broader sense, this reflects a growing awareness and appreciation for handmade, sustainable gifts that contribute to our health and the environment. It’s a step away from the commercial and a step towards the personal and meaningful. The act of creating something with one’s own hands gives the gift a special significance, making it all the more cherished by the recipient.
When creating your scrub, you’re not just mixing ingredients; you’re blending love and care into a little jar of wellness! So, as you measure, mix, and personalize your coconut oil Epsom salt scrub, know that you’re part of a larger movement embracing healthful, mindful living.
If you’d like to see a full length video tutorial of the process on Facebook, you can check it out here. Happy creating friends!
]]>
Please note***This post contains affiliate links. If you make a purchase via one of these links I may receive a small commission from your purchase. This commission does not add any cost to you but helps me to continue to share new products and ideas with you. Thank y'all for always being so supportive!!
Here’s a look at the vanity “before”. I thrifted this sweet little vanity over 10 years ago and it’s survived so many moves but has gotten banged up in the process! I have the mirror for it…somewhere. I’m waiting for it to turn up in some random box or hiding place!
Before we get into the nitty-gritty of refinishing furniture, let's talk about power washers. These hardworking tools are not just for blasting away dirt and grime from your patio or car. They can also work wonders on your furniture! A power washer uses high-pressure water to remove old paint, stains, and varnish from surfaces, making it the perfect tool for refinishing projects when used properly.
Now that you're all pumped up about power washers, it's time to get down to business. Before you start power washing your furniture, you need to do some prep work. It's best to work outdoors in a grassy or gravel area rather than cement to prevent staining or discoloration. Next, remove the hardware. Then gather your supplies to get started!
**Links for all of the supplies can be found here.
Now comes the fun part. It's time to unleash the magic of the finish remover! Put on your protective gloves and grab your trusty paintbrush. Apply a coat of finish remover to your entire piece of furniture. Allow the finish remover to dry for ~15 minutes.
Alright, it's time to unleash the power! Start by adjusting the pressure on your power washer to a level that won't damage your furniture. It's best to start in an inconspicuous place and test different nozzles to prevent damage to the wood. Then, hold the nozzle about 6-8 inches away from the surface and move it in a sweeping motion. Watch as the power washer effortlessly strips away the old finish, revealing the beautiful wood underneath. It's like magic, but with water! If the original finish had thick layers or heavy polyurethane, you make need to repeat this step more than once.
Welcome to the fun part of furniture refinishing – sanding! Grab your sander and get ready to expose the magic of your piece. Detail sanders work best on frames and in corners or small areas. Orbital sanders are the best option for large surfaces such as a table top or headboard of a bed. Since this piece has both types of surfaces, I used both sanders.
Start with the rough stuff, using a coarse-grit sandpaper to tackle any left over varnish and rough patches. I used 60 grit sand paper with the detail sander first on the entire piece. Remember to follow the wood
grain and keep the sandpaper along the piece. As you progress, switch to finer-grit sandpapers. Next, I used 120 grit over the entire piece followed by 220 grit to leave a soft and smooth finish.
Once you've finished sanding, it's time to add the finishing touches. First dust off the piece with a clean cloth rag or a blower to save some time. You can choose to leave the wood bare but I recommend a light coat of clear furniture wax to protect the wood.
Now, a word of caution: power washing furniture can be addictive! Once you see the amazing results, you'll want to power wash everything in sight! If you’d like to see the spindle bed I also used this method to refinish, you can read the blog post here.
There you have it - a quirky, fun, and slightly unconventional way to refinish your furniture. With a power washer in hand, you can transform your old, tired pieces into stunning works of art while saving a little time and energy! So, grab your power washer and let the adventures begin!
If you’d like to see a full length video of the process, you can watch my YouTube video here. I can’t wait for you to try this method and I would love to see your furniture rehab projects! Happy Power Washing friends!
]]>
Please note***This post contains affiliate links. If you make a purchase via one of these links I may receive a small commission from your purchase. This commission does not add any cost to you but helps me to continue to share new products and ideas with you. Thank y'all for always being so supportive!!
Before you start, make sure your wood is clean and smooth. Sand away any rough edges or splinters. If using reclaimed or rustic wood, remember to leave some of the character and charm of the time worn wood! My piece of wood was slightly bowed so I made sure to use the concave side for the top of the centerpiece.
Measure and mark the spots where you want your candles to go. For this centerpiece I found the center which was 5 1/2" then spaced the candle holes in an alternating pattern of 3 offset rows starting and ending 2 1/2" from the edge of the board.
If you'd like to follow the pattern I used, I have a free printable template for newsletter subscribers then can be downloaded here.
You can also get creative with the arrangement - symmetrical, asymmetrical, or even random. It's your centerpiece, so let your imagination run wild!
Now it's time to bring out the power tools! Use a 15/16" wood boring drill bit. This size most closely matches the diameter of most standard taper candles and LED tapers. Carefully drill the holes. Make sure to keep a steady hand and go slow to avoid any mishaps. Always remember to wear eye shields or safety goggles. Safety first, folks! Remember to stop drilling ~1 1/2" deep hole to prevent drilling through the wood completely.
Take your leg risers and apply glue to one end. Attach them to the bottom of your wood piece, making sure they are evenly spaced. These risers will give your centerpiece the height it needs to stand out (literally and metaphorically). I glued the candle cups ~1/4" from the edge of the board.
Finally, it's time to add the candles! Place them in the pre-drilled holes and make sure they are secure. Museum Wax is the best way to secure the taper candles into the holes to ensure a secure, straight fit!
Then, light them up and watch as your DIY Wood Riser Centerpiece transforms your table into a cozy, inviting space.
***Remember*** never leave a candle burning unattended and consider substituting LED battery operated candles for increased safety.
Now that you have your beautiful centerpiece, let's talk about its versatility. This masterpiece isn't just limited to being a candle holder. It can also double as a serving board or a seasonal centerpiece. Talk about getting more bang for your buck!
So, the next time you're hosting a dinner party or just want to add a touch of charm to your everyday meals, whip out your DIY Wood Riser Centerpiece and watch as your guests marvel at your creativity. It's time to elevate your tablescapes and take your dining experience to new heights!
If you love this piece but don't have the option to DIY it, you can BUY it! My friend Jennifer from Birchlane by Jennifer is selling her handmade version of this centerpiece. You can head to her website and purchase one of her beautiful creations here.
If you’d like to see a short video with up close views of this riser on Instagram you can check it out here. I would love to see your DIY Wood Riser creations! Happy DIYing friends!
]]>Winter is here, and it's time to cozy up your living space. Whether you're a fan of snow or prefer to stay indoors, these tips for cozy winter decorating will help you create a warm and inviting atmosphere. So grab a cup of hot cocoa, put on your favorite fuzzy socks, and let's get started!
Please note***This post contains affiliate links. If you make a purchase via one of these links I may receive a small commission from your purchase. This commission does not add any cost to you but helps me to continue to share new products and ideas with you. Thank y'all for always being so supportive!! You can shop all of the home decor links in this post by CLICKING HERE.
Bring the beauty of the outdoors inside by incorporating natural elements into your winter decor. Gather some branches and arrange them in a vase for an instant rustic touch. You can also hang grapevine wreaths on your walls or doors for a cozy and festive look. These simple additions will bring a touch of nature to your space and create a cozy vibe.
Nothing says cozy like the soft flickering glow of candles. Place them strategically around your home to create a warm and inviting ambiance. Taper candles with vintage brass candlesticks are a classic touch or opt for scented candles with fragrances like cinnamon, vanilla, or pine to add an extra layer of coziness. Just make sure to keep an eye on them and never leave them unattended. Safety first, folks! Battery operated LED candles are also a great choice!
Snuggle up with some fluffy throw pillows and warm blankets to make your space extra cozy. Choose pillows and blankets in soft, plush fabrics like faux fur or chunky knits. Mix and match different textures and patterns to add visual interest. Not only will they keep you warm during those chilly winter nights, but they'll also add a touch of style to your space.
Add some winter-themed art to your walls to create a cozy and festive atmosphere. Look for prints or paintings that feature snow-covered landscapes, cozy cabins, or winter wildlife. You can also create your own winter art by framing some of your favorite winter photographs. It's a great way to showcase your creativity and bring a personal touch to your space. I love to use downloadable art! (You can read about my art hack for open back frames here.) This Digital Vintage Winter Art Gallery Collection was already curated which made the gallery wall super easy to put together in these thrifted vintage open back frames!
With these tips for cozy winter decorating, you'll be able to transform your space into a warm and inviting haven. Embrace the winter season and create a cozy atmosphere that will make you want to hibernate until Spring. Happy decorating!
If you’d like to see a short video of this space on Instagram you can check it out here. I would love to see your cozy Winter spaces creations! Stay cozy friends!
]]>
Please note***This post contains affiliate links. If you make a purchase via one of these links I may receive a small commission from your purchase. This commission does not add any cost to you but helps me to continue to share new products and ideas with you. Thank y'all for always being so supportive!!
Are you ready to jingle all the way into the holiday season? Well, grab some wood, paint and tools because we have a festive DIY project that will make your spirits bright! The DIY Vintage Santa Cut Out is a jolly addition to your holiday decorations that will bring a touch of nostalgia and whimsy to your home. Whether you're a DIY pro or a holiday hobbyist, this project is sure to bring you joy (and maybe a few laughs) as you create your very own vintage Santa masterpiece.
Before we dive into the jingle bells and whistles of this project, let's gather our supplies. Don't worry, you won't need Santa's workshop for this one! Here's what you'll need:
Now that we have our supplies, it's time to channel our inner elves and get crafty! Follow these steps to create your very own DIY Vintage Santa Cut Out:
Alright, folks, it's time to get crafty and bring some vintage charm to your holiday decor! The first step in creating your very own DIY Vintage Santa Wood Cut Out is to find the perfect vintage Santa image. Now, you might be wondering, where on earth can I find such a thing? Well, fear not! The internet is a treasure trove of vintage goodness. Just hop on your favorite search engine and start sleuthing for that jolly old St. Nick (adhering to copyright rules of course!).
Once you've found the vintage Santa image that makes your heart skip a beat, it's time to transfer it onto your trusty piece of wood. Now, you have a few options here. You can either trace the image directly onto the wood by channeling your inner Picasso and freehand draw it. If you're feeling extra fancy (or unable to freehand like me!), you can project the image onto the wood using a projector. The choice is yours, my creative friend!
Now comes the moment of truth. It's time to grab your favorite jigsaw and start cutting out that vintage Santa image from the wood. Take your time, be careful, and remember, Santa is watching, so no slip-ups allowed! If you're not the handiest person in the world, don't worry. You can always ask a friend or family member to lend a helping hand. After all, 'tis the season for spreading joy and sawdust!
Now that you have your vintage Santa cut out, it's time to bring him to life with a splash of color. Grab your paintbrushes, mix up some festive hues, and let your creativity run wild. You can go for a traditional red and white Santa or get creative with custom colors. Remember, this is your masterpiece, so there are no rules (except maybe don't paint Santa green, that might confuse Santa with the Grinch).
Once your vintage Santa is looking dapper in his new paint job, it's time to give him a sturdy frame to call home. Grab a piece of framing wood and secure your Santa cut out onto it using some trusty screws or nails. Make sure he's nice and snug, because we don't want Santa taking any unexpected tumbles!
And voila! You've done it! Your DIY Vintage Santa Wood Cut Out is complete and ready to spread some holiday cheer! Find the perfect spot to display your masterpiece, whether it's on the mantel, hanging on the wall, or even propped up on a shelf. Every time you catch a glimpse of your vintage Santa, you'll be reminded of the joy of creating something with your own two hands. So go ahead, bask in the glory of your craftiness, and let Santa bring a touch of vintage magic to your holiday season!
If you’d like to see a short video of the process on Instagram you can check it out here. I would love to see your Santa creations! Please tag me on social media or send me an email! Merry Santa Making friends!
]]>Looking for a way to add fun and whimsy to your porch for Trick or Treating? This Trick or Treat Stand is their perfect way to make everyone feel welcome! How fun would it be to leave this out the week of Halloween for mailmen, delivery drivers and visitors! These iconic symbols of Halloween evoke childhood memories and carry an irresistible charm! So let’s get started DIYing these plastic Jack-O-Lanterns into an adorable stand!
Start by removing the handles from the plastic jack-o-lanterns. You won't need them for this project, so feel free to discard. I used wire cutters to easily remove the handles. Scissors will work just as well.
Next, use white caulk or silicone to seal the holes in the jack-o-lanterns left by the handles. Alternatively, you can use tape to cover the holes if you don't have caulk or silicone on hand.
Now it's time to get creative! Grab your spray paint and give the jack-o-lanterns a fresh coat. This will give them a clean and uniform look. I used white paint (of course) but feel free to let your creativity shine with your favorite color!
Allow the spray paint to dry completely before moving on to the next step. This usually takes about an hour, but it's always best to check the instructions on the paint can.
Before gluing, add rocks or pieces of cement or bricks inside the bottom jack-o-lantern to keep the tower stable. Using hot glue or super glue, carefully stack the jack-o-lanterns on top of each other to create a tower. Make sure they are securely attached to one another.
Take your plastic bucket or basket and place it on top of the stacked jack-o-lanterns. Gluing the bucket is optional. If you don't glue the bowl to the tower, you will have the ability to take the candy inside if you want to use it for more than one day. What a perfect way to treat mailmen, delivery drivers and visitors the week of Halloween!
For the finishing touch, print out my “Trick or Treat" printable on cardstock and attach it to the bucket or basket. This will let everyone know they are free to help themselves!
Now you have a unique DIY trick or treat stand made from simple plastic jack-o-lanterns. Fill it up with yummy candy and get ready to delight all the trick-or-treaters that come your way! Remember, Halloween is all about having fun and getting creative, so don't be afraid to add your own personal touches to this project.
I’ve created a short video of the process with some up close views on Instagram that you can see here. I’d love to see your projects and creations! Feel free to send me a DM or an email with your photos or videos! Happy Halloween Friends!
Please note***This post contains affiliate links. If you make a purchase via one of these links I may receive a small commission from your purchase. This commission does not add any cost to you but helps me to continue to share new products, companies and ideas with you. Thank y'all for always being so supportive!!
]]>
Hey there crafty Falloween friends! Are you tired of the same old plastic orange pumpkins on every doorstep in the neighborhood? Well we have a super fun way to turn a simple fence board into a gorgeous lantern that’s sure to elevate your Fall porch and light up the night like never before!
Before we get started with the DIY, I’ve teamed up with my friend Jennifer from Birch Lane by Jennifer to bring you a BUY option! I know time and tools can be a problem with some of these DIYs so if you’d like to purchase her adorable, high quality lanterns made of cedar shown below, you can visit her website here.
Now if you’ve got your tools handy and you’re ready to get crafting, let’s get started with this Falloween DIY!
To build a small wooden lantern with finished dimensions ~8”H x 5 1/2” W x 6” D, you will need the following supplies:
*Dimensions can be scaled up to make a medium and large size.
*Safety Tip: Since the lanterns are made of wood, use a battery operated light and DO NOT use a traditional candle.
For clarity, we’ll label each piece of wood used in the project:
1. Cut the fence board into four pieces 7” long (pieces ABCD).
2. Set two pieces aside to use for the front and back (A and B).
3. Cut two pieces to resize to 3.5” wide (C and D).
4. Cut two pieces 6” long for the top and bottom (pieces E and F).
5. Glue and nail the sides (CD) to the front and back (AB).
6. Print out face templates & cut out the black areas to use as a template for tracing.
7. Trace the template onto the front piece of wood (A).
8. To cut out the face, drill a starter hole for each section using a 3/8” drill bit. Cut out the face using a jig saw.
9. Glue and Nail the bottom (F) onto the lantern.
***Optional: Add a 2”x2” piece of wood and/or a piece of a branch or stem to the top (E) which can be used as a handle.
And there you have it! You have successfully built your own wooden lantern. Now you can place a battery operated tea light or Touch Light inside for a cozy and warm ambiance.
Building your own wooden lantern is a fun and rewarding project! It allows you to showcase your woodworking skills and create a beautiful piece that can be used as a centerpiece or a decorative item in your home or porch for years to come!
I’ve created a short video of the process with some up close views of the lanterns on Instagram that you can see here. I’d love to see your projects and creations! Feel free to send me a DM or an email with your photos or videos! Happy Falloween Friends!
Please note***This post contains affiliate links. If you make a purchase via one of these links I may receive a small commission from your purchase. This commission does not add any cost to you but helps me to continue to share new products, companies and ideas with you. Thank y'all for always being so supportive!!
]]>
To create a beautiful book page leaf garland, you'll need the following supplies:
Now that you have all your supplies ready, let's dive into the step-by-step process:
Grab those book pages and start cutting out leaf shapes. You can use my leaf template as a guide or get creative and make your own unique leaf shapes. Remember, this is your chance to show off your artistic skills!
**You can access the printable for my leaf template by subscribing to my email list here. Once subscribed, an email will be sent to you will the password for the entire free printable collection!
Take each leaf you've cut out and fold it in half. This will give your garland a more realistic and three-dimensional look. Plus, it adds a touch of elegance and realism to the leaves!
Now it's time to bring those leaves to life! Apply some hot glue at the base of each leaf and press it together to hold the folded position as shown below on the leaves on the left. This also adds another layer of depth to the leaves.
Grab your grapevine wire and start attaching the leaves! Apply some hot glue to the back of each leaf's stem and wrap it around the grapevine wire. This will secure the leaves and create a beautiful garland that you can hang anywhere!
The silicone finger protectors came in super handy for this step to prevent finger burns with the hot glue!
To add fullness and depth to your garland, alternate between folded leaves and flat leaves. This will give your garland a sense of depth and dimension. It's like creating a mini forest that's ready to be displayed!
Now that your book page leaf garland is complete, it's time to find the perfect spot to hang it. Whether it's in your living room, bedroom, or even outdoors, this garland will add a touch of whimsy and creativity to any space. Sit back, relax, and enjoy the beauty of your handmade masterpiece!
I also created this simple oak leaf book page garland last year that you can pair with this garland for a completed look! You can access the blog post for that garland here.
Remember, crafting is all about having fun and letting your creativity shine. So go ahead, gather your supplies, and embark on this delightful book page leaf garland adventure. Happy crafting!
Please note***This post contains affiliate links. If you make a purchase via one of these links I may receive a small commission from your purchase. This commission does not add any cost to you but helps me to continue to share new products, companies and ideas with you. Thank y'all for always being so supportive!!
]]>
Looking to add a touch of natural beauty to your home decor? Why not try making your own DIY Pinecone Garland? It's a fun and easy project that will bring a touch of whimsy to any space. Plus, it's a great way to get creative and add a personal touch to your home. So grab your crafting supplies and let's get started!
The first step in creating your Pinecone Garland is to prepare the pinecones. These Pinecones were in an airtight bag since last year so I was not worried about bugs. If you are worried about the little critters that may be hanging out in the pinecones you can bake them in the oven at 250 degrees for 1-2 hours. You can also purchase pinecones that are already prepared from craft stores or Amazon. These pinecones from Hobby Lobby come in a variety of sizes and are very inexpensive.
Now that your pinecones are prepped and ready to go, it’s time to add the eye screw hooks. Start by placing small eye screws onto the base of each pinecone. This will allow you to easily attach them to the twine later on. Make sure the eye screws are securely fastened so that the pinecones don't fall off.
Now it's time to add a little sparkle to your pinecones. Apply RubnBuff to each pinecone, using a small brush. RubnBuff comes in a variety of colors, so choose one that matches your decor. I love the Antique Gold Color! This step will give your pinecones a beautiful, shimmering finish.
Once the RubnBuff has dried, it's time to string your pinecones together. Take a piece of twine and tie a knot around the eye screw of the first pinecone. Leave a few inches of twine between each pinecone to create a visually pleasing spacing. (I used ~4’ spacing for this project). Continue this process until all of your pinecones are securely attached to the twine.
And voila! You now have a stunning DIY Pinecone Garland that is sure to dress up your Fall decor. Hang it on your mantel, drape it across a bookshelf, or use it as a festive decoration for a special occasion. The possibilities are endless!
This is such a fun and easy way to add a touch of nature and whimsy to your home this Fall. If you’d like to see a short video of the process on Instagram you can check it out here. I would love to see your pinecone creations! Please tag me on social media or send me an email! Happy Pinecone Painting friends!
Please note***This post contains affiliate links. If you make a purchase via one of these links I may receive a small commission from your purchase. This commission does not add any cost to you but helps me to continue to share new products, companies and ideas with you. Thank y'all for always being so supportive!!
]]>Terra Cotta and pumpkin vases were the big decor trends of last Fall so when thinking about my Fall decor for this year, I knew I wanted to combine the two in a new and unique way! After going through all of my Fall decor I found a few left over paper mache pumpkins in my stash. The texture, size and style of the pumpkins was absolutely perfect for this project.
Pumpkin vases add a rustic yet elegant seasonal touch while serving as a stunning centerpiece for your Fall gatherings. It’s so easy to see why these have become so popular in home decor! So let’s get starting making our Terra Cotta Pumpkin Vase masterpiece!
Start by tracing an outline of the opening you want to cut out of the stem using a pen or pencil.
Next, use a knife to cut out the stem.
Paint a base coat in a light neutral tone. I used the color Parchment.
Add darker contrasting accent colors in the creases of the pumpkin and intermittently over the surface to add depth and dimension.
Let the pumpkin dry overnight, until completely dry to the the touch.
Finally, add assorted florals, branches and stems to really bring your vase to life!
If you’d like to see a short video of the process on Instagram you can check it out here. I would love to see your pumpkin creations! Please tag me on social media or send me an email! Happy Pumpkin Painting friends!
Please note***This post contains affiliate links. If you make a purchase via one of these links I may receive a small commission from your purchase. This commission does not add any cost to you but helps me to continue to share new products, companies and ideas with you. Thank y'all for always being so supportive!!
]]>When it comes to creating a cozy bathroom, it's all about the little details. Creating a spa-like ambiance can turn your bathroom into a sanctuary for you and your guests. I'm sharing my five tips to transform your bathroom into a warm and inviting space with just some simple touches!
Who says you can't have luxurious linens in your bathroom? Treat yourself to soft, fluffy towels and bath mats that make you feel like you're in a spa. Turkish towels not only look beautiful but they air dry quickly and can be the perfect blend of beauty and function.
Instead of a typical bath mat, I opted for a washable rug from Ruggable with a vintage pattern. It not only elevated the look of the space, but is also super durable and can be washed to keep things fresh and clean! Opt for warm colors and plush textures to add a touch of coziness to your bathroom.
Why should the living room have all the fun? Hang some artwork in your bathroom to give it a personal touch. Whether it's a painting, a photograph, or a quirky print, art can instantly elevate the ambiance and make your bathroom feel like a gallery.
Clutter can quickly kill the cozy vibe in any room, including the bathroom. Invest in stylish baskets and glass containers to keep your toiletries organized. Not only will it make your bathroom look neater, but it will also add a touch of elegance to the space. Since this is our only bathroom at the moment, storage is limited. I store extra toilet paper rolls in a seagrass market tote to keep them accessible but hidden.
Changing out store bought soap and lotion dispensers and replacing them with matching ones is a great way to keep a calming aesthetic. I use these dispensers in my kitchen and bathroom. They’re heavyweight glass and can be used with or without the labels.
Plants are a fantastic way to breathe life into any room, and the bathroom is no exception. Choose low-maintenance plants like succulents or ferns that thrive in humid environments. Not only will they add a pop of color, but they will also purify the air and create a calming atmosphere.
Nothing says cozy like the soft flickering glow of candlelight. Place scented candles around your bathroom to create a relaxing ambiance. Opt for warm, comforting scents like vanilla, lavender or eucalyptus to enhance the cozy atmosphere.
You can also diminish the need for harsh lighting while soaking in the tub by using lamps. I added this rechargeable lamp to the vanity and I love having it on in the early mornings and late night soaks in the tub instead of the bright overhead lights.
By following these five tips, you can transform your bathroom into a cozy oasis where you can unwind and relax. So go ahead, indulge in some beautiful linens, hang up your favorite artwork, and create a space that feels like a warm hug. I’ve linked all of the sources for you on my LTK account here.
Please note***This post contains affiliate links. If you make a purchase via one of these links I may receive a small commission from your purchase. This commission does not add any cost to you but helps me to continue to share new products, companies and ideas with you. Thank y'all for always being so supportive!!
]]>
As a back up plan, we intended to use wood for the countertops since it was a less expensive and still beautiful option until we could afford the marble I had always dreamed of. Knowing I was a little disappointed, my husband Skip began researching epoxy and marble alternatives. When he found Stone Coat Coutnertops White Marble Epoxy Kit I was cautiously optimistic. Could these really be as beautiful as they looked in pictures for such a fraction of the cost of marble? We took a chance and ordered a small kit with the the intentions of making a sample. Once we did, we were completely hooked! We have used this White Marble Epoxy Kit for our kitchen countertops and also a marble table top.
In my earlier blogging days, I wrote a blog post about the marble table top but did not take detailed pictures of the process. I do plan to update it soon but if you’d like to read it, you can find it here. I did make a short Instagram video of the process that you can watch here and a follow up video here.
With so many things on the to-do list for an entire home remodel, the bathroom has been neglected for almost 2 years. Let’s take a look back at the scary situation we started with. Yikes!
For our initial phase of the remodel, we removed and changed out the tub and toilet (which by the way sat on the front porch for about 6 months and drove me absolutely crazy!), changed the floor, changed the ceiling and painted the walls. So we basically freshened it up and got it usable but not beautiful. And it stayed in the “freshened up” stage until January 2023 when we made a huge push to get things done for a magazine shoot (more about that later).
At that time, we added a peg rail accent wall, painted the vanity and light fixture, added decor…and then ran out of time. So the bathroom has been at about 90% complete for the past 8 months. Determined to get this thing completely finished, we planned to replace the countertops with epoxy and the timing was much better to create a step by step look at the process to share with you.
Well, I think I’ve built up the anticipation for long enough so let’s get started with the process we used to make these beautiful surfaces!
Since there needs to be time allotted for drying, the project takes several days to complete but only requires short increments of actual hands on. The initial steps for the undercoat and colorant application for this countertop project took approximately 1 hour of hands-on time. The final top coat took approximately 30 minutes. Drying time for both steps is 48 - 72 hours. So with that said, the entire project including installation can be completed in under a week or less. Recommended temperatures for epoxy are from 60 - 80 degrees so working in a climate controlled area is best.
So now that we’ve gathered all of our supplies, let’s get the process of making beautiful epoxy marble countertops started!
1. Measure and cut pieces of countertop using MDF or desired wood product. For this project, we needed to cut out a countertop surface and trim pieces to fit around the vanity.
2. Lightly sand MDF with 220 grit sand paper by hand to prep and clean the surface. Wipe dust off of the surface with a dry cloth.
3. Protect your work surface. I used my dining room table as a work surface, so I added 3 layers of brown contractor paper and then covered the work surface and drip area of the floor with heavy duty garbage bags. You will also want to elevate the countertop pieces from the work surface with scrap wood.
4. Using the 4” foam roller, paint the surface with the white undercoat provided in the kit. Apply liberally covering the entire surface.
5. Let the undercoat dry for a few hours until completely dry to the touch. The under coat for this project took about 2 hours to dry.
6. Calculate amount of epoxy needed. Stone Coat Countertops has a fantastic calculator tool on their website to make this step super easy. You can access it here.
7. Measure amount needed and label clear cups with the amount needed and label them A & B for the next step. You can also use disposable plastic measuring cups but we opted to use the clear cups we had on hand.
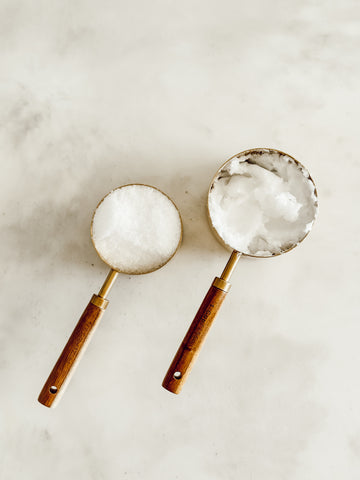
8. Mix the Epoxy in a 1:1 ratio. Far example, if you need 3 cups of epoxy for your project, you will need 1 1/2 cups of Part A (Resin) & 1 1/2 cups of Part B (Hardener).
9. ****VERY IMPORTANT***** You will add Part B FIRST to the lined pail then add Part A. Mix thoroughly, stirring vigorously using a paint stick.
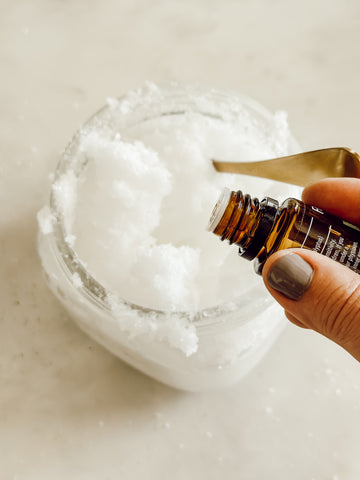
10. Set aside a small amount (~1/8 cup) of the clear epoxy mixture in one of the plastic cups. Add ~ 1/2 teaspoon black colorant to the epoxy mixture using a plastic spoon and stir until well combined. This black epoxy will be used to add the black veining so set aside for later use.
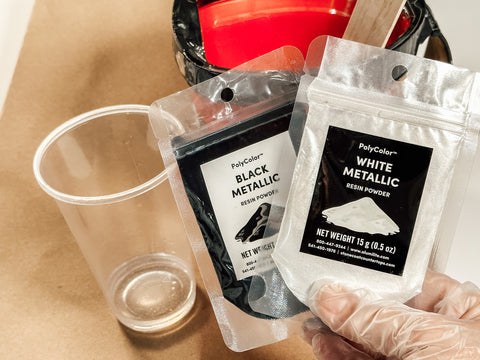
11. Add ~1 1/2 to 2 tsp white colorant to the remainder of the epoxy mixture in the pail stirring vigorously in a circular motion until well combined. The mixture should have a pearl look.
12. Pour the white epoxy mixture onto the white countertop surface.
13. Trowel using a 1/8” V notch trowel. Since my project pieces were small, I used a small plastic trowel. Coat surface evenly working the epoxy all along the surface and use an angled brush dipped in the white epoxy mixture to cover the sides.
14. Begin dabbing the angled brush with medium pressure onto the epoxy coated surface in a random pattern. This technique removes trowel marks and helps to vary the white background. Continue this process over the entire surface and edges.
15. The next step will involve adding the black colorant. To do so, dip the end of the paint stirring stick into the black colorant. As the black epoxy runs off the bottom of the stick, drizzle it over the white epoxy surface of the countertop in a veining pattern of your choice.
16. After veins are created, use angled brush to feather (spread) the lines using the same dabbing technique as previously done with medium pressure. Continue feathering just along the drizzle line you created with the paint stick. You can also opt to leave some of the veining lines unfeathered if you choose. As a side note, you will be able to further (spread) the black colorant in the next step so it’s generally better to lightly feather the veining at this stage if you want a tighter veining pattern leaving more of the surface covered with white marble.
17. Use a hairdryer or heat gun along the veining lines to apply heat and move or spread the colorant further. This is where the magic happens and your artistic creativity can really shine through in your project! It’s actually my favorite part!! It’s so satisfying to watch the colorant move along the surface and create a beautiful natural looking veining pattern! Ok I digress…moving on!
18. Once you have your veining pattern just the way you want it, let the surface dry for 48 hours. (It’s hard I know!) There will be air bubbles but don’t worry, those will be removed in the next step.
19. After the countertop has dried, it’s time to move onto to the final steps. Since there are air bubbles in the surface, those will need to be removed by lightly sanding the entire surface with 220 grit sandpaper.
20. Next, mix another batch of epoxy in the same manner as the previous step (equal parts A&B adding Part B FIRST). This epoxy will be used as the top coat/clear coat so no colorant will be added in this step. (*Please note for white marble epoxy Stone Coat Countertop recommends adding an Art Coat and an Ultimate Top Coat for added durability and to further prevent yellowing. We didn’t have these products on hand so we used the clear epoxy as we have in previous projects. Please see their website for the steps needed to add those coats.*)
21. Use a trowel in the same manner as before evenly coating the surface and an angled brush to coat the edges. Also repeat the feathering process over the entire surface for this clear top coat as done previously.
22. To remove air bubbles from this final top coat, use a hand held propane torch to lightly cover the surface and remove the air bubbles. I kept the torch flame ~ 6-8” from the surface to prevent overheating.
23. Let the countertop dry for 72 hours prior to handling or installing a sink. (Countertop and sink installation will be covered in a separate blog post and video).
24. If your edges have drips or runs or if the color is faded, you can touch up the areas on the edges by mixing a small batch of the black colorant and clear coat and reapply as needed.
25. Use a razor blade or power oscillating tool with flat blade to remove all drips from the under edge of the countertop.
26. Enjoy the gorgeous countertops you created and celebrate with all of money you saved!!! This total project cost under $200 and was well worth this small amount of time needed to get this done! I am honestly so proud that I completed this project with the help and guidance of my husband! It was so much fun and made such a huge impact in our bathroom. Full bathroom reveal coming soon!
If you’d like to see a short video of the process on my Instagram Stories Highlights you can check it out here. I would love to see your DIY’ed countertop creations! Please tag me on social media or send me an email with some before and after! Happy DIY’ing friends!
Please note***This post contains affiliate links. If you make a purchase via one of these links I may receive a small commission from your purchase. This commission does not add any cost to you but helps me to continue to share new products, companies and ideas with you. Thank y'all for always being so supportive!!
]]>
After living with our Epoxy countertops and dining table top for the past 2 years, I can truly say I have no regrets! The finish has been super durable and the results are truly stunning! This epoxy has fooled even the most discerning guests who truly cannot believe it isn’t natural stone. Once people find out that the countertops are epoxy, the questions usually begin in rapid fire! I’ve complied a list of the most frequently asked questions that should answer all of your epoxy wonderings.
Please note, this post is a discussion of my personal experience and process. I'm sharing my honest opinion and experiences with you for reference but please always refer to the manufacturer's recommendations.
The short answer is yes. Over time, epoxy with a white undercoat will yellow which is why it’s so important to choose a quality brand like Stone Coat! What sets Stone Coat apart is the high quality UV resistant products used to prevent rapid yellowing. They even offer a special Art Coat and Ultimate Top Coat designed for this purpose. As I’ve mentioned previously, we have had our countertops for 2 years and table for about 1.5 years and both have aged without any yellowing. White marble epoxy kits are not recommended for outdoor use.
I have treated these counter tops as I have all other countertops, with moderate care. I use cutting boards for food prep and and trivets for hot pots and pans straight from the oven and have not had any issues at all. According to the Stone Coat Website, the product is heat resistant up to 450 degrees.
As far as cleaning, Stone Coat does offer several cleaning products. For day to day cleaning, I have used my 2 ingredient nontoxic cleaner and haven’t had any issues! I also periodically use the the liquid smooth polish from Stone Coat which works great for keeping the countertops smooth and shiny.
Our kitchen is the heart of our home and I can promise you these countertops have been well used (abused!). Red wine, beets, tomato sauce, tea and coffee have all made their way onto the countertops without leaving their mark :)
The one gallon White Marble Epoxy Kit is ~$120 which is far below the estimated $100 - $200 per square foot for marble! Accounting for wood and other supplies, my bathroom countertop project total was just below $200.
Yes!!! Stone Coat has several YouTube Videos and Blog posts with step by step instructions on how to apply over existing countertops and special kits for bathtubs. I haven’t used the tub kits but a shower is up next on our to-do list so stay tuned for that! You can read more about their shower and bathroom kits here.
NOOOOO!!! My husband Skip did our kitchen countertops and he walked me through our most recent bathroom countertop project. The process is very straightforward and so easy that even I can do it...and you can too!
Up next, I’m sharing a step by step of the epoxy countertop process from start to finish with detailed pictures and giving you all of the products, sources and details! (Update: You can click here to read the post).
Hope that helps! When you give this a try, I’d love to see your epoxy projects! If you still have questions you can always reach me via the Contact Us Tab on our website with any questions you might have!
Please note***This post contains affiliate links. If you make a purchase via one of these links I may receive a small commission from your purchase. This commission does not add any cost to you but helps me to continue to share new products, companies and ideas with you. Thank y'all for always being so supportive!!
]]>I have always loved the sight and sounds of a piano since I was a young girl. Classical music was a fundamental part of my childhood in ballet lessons and quietly playing in the background of my grandparents home. I was so mesmerized by the fluidity of the pianists hands on the piano keys and the amazing melodious sounds it produced.
In my Freshman year of college at LSU, I took private piano lessons and learned to play “When the Saints go Marching In” but without much practice over the Summer, I quickly forgot what little knowledge I had gained and transitioned back into a music enthusiast rather than musician.
Fast forward about 25 years to the pandemic (yes something good actually came out of that!). My youngest son taught himself to play the piano with an iPhone app on a keyboard and my passion for piano instantly came flooding back! Since then, I’ve been on the hunt for an upright vintage piano both for aesthetics and also obvious space saving considerations.
Over these past few years, I have found a few on Facebook Marketplace but my husband Skip was a firm NO…and he’s never a firm NO. The thought of the logistics of moving such a heavy piece and the space it would take up in our home was completely unappealing to him. So I quietly waited, searched and maybe even plotted against him a little until I found the piano that was meant to be ours!
On a random Sunday, I was doing my usual Facebook Marketplace browsing for hidden gems when I saw the vintage Ludwig & Co piano. As luck would have it, the seller was actually a relative of mine! When I reached out, I initially asked about the condition and history thinking the piano was his, but he explained that the piano was actually abandoned in one of his storage facilities. I immediately knew I needed to rescue this beauty…but Skip was still a firm NO. Ughhh. After reaching out and politely declining to buy the piano, it was offered to us for FREE! This was just enough to peak Skip’s interest and when he actually saw the piano, it was a done deal!!
Now of course all of this is taking place in the dead heat of Summer in the middle of a heat advisory. But once Skip is determined, there’s no going back! He built a special ramp out of wood to move the piano up onto the trailer and into our house (which is elevated ~4 feet from ground level!). We rented a U-haul trailer and set out in the middle of the day to rescue our princess!
There were lots of scary moments, including one moment when the piano almost toppled off of the ramp onto the cement driveway and when Skip got dizzy from pushing the piano up the ramp in the blistering heat, but in the end…everyone survived the move! I made a short Instagram video about the process that you can watch here.
On our initial visit to check out the piano, it appeared overall to be excellent condition. All of the keys and the wood exterior seemed to be intact. However, once we got the piano home we realized a previous owner tried to strip the varnish finish off the piano and apparently stopped in the middle of the job. There were even areas on the piano with dried stripping gel!
Thankfully, when we had the piano tuned by an amazingly knowledgeable tuner, he showed Skip how to remove most of the wood panels on the exterior making the job of sanding so much easier and also allowing us to see the literal inner beauty of the piano! More about that later.
We sparingly used QCS Nontoxic Stripper to remove the previous stripping debris and also the remaining varnish. With the QCS and fine grit sand paper we were able to remove the varnish but keep the original stain color which is the perfect gorgeous medium brown!
As I mentioned earlier, the piano tuner showed Skip how to remove the exterior panels to expose the strings and vintage cast iron harp and WOW! He explained that this was common in the 1920s when the piano was crafted to increase the volume. And the piano is truly so much louder when played this way. But the real benefit for me is seeing all of the gorgeous vintage goodness hidden inside this piano! Such a stunner right???
The Vintage Ludwig and Company Upright Piano made in 1920 is a true gem! With its rich history and exceptional craftsmanship, this piano stands out among other uprights of the period.
Ludwig and Company was a renowned name in the early United States piano industry. Established in the late 19th century, Ludwig and Company quickly gained a reputation for producing high-quality instruments. Their upright pianos, in particular, became highly sought after for their exceptional sound and durability. Our vintage Ludwig is a true testament to both!
The Upright Piano by Ludwig and Company was a pinnacle of craftsmanship of that era. Each piano was meticulously handcrafted by skilled artisans, ensuring the highest level of precision and attention to detail. The use of premium materials and traditional construction techniques contributes to the piano's exceptional sound quality and longevity. Based our piano's serial number, it was crafted in 1920.
One of the most captivating aspects of this Vintage Ludwig and Company Upright Piano is its timeless design. Even after over one hundred years, the classic design still looks beautiful in my home today. The elegant curves, classic details, and rich wood finish exude a sense of sophistication and grandeur from the period. This piano not only serves as a musical instrument but also as a stunning piece of furniture that adds so much charm to our home.
For our family, owning this Vintage Ludwig and Company Upright Piano made in 1920 means owning a piece of history. This piano has witnessed the passage of time, preserving the melodies of the past and carrying the legacy of its previous owners. It serves as a reminder of the craftsmanship and artistry of a bygone era and we are so proud to be the caretakers!
This piano is a true masterpiece that combines exceptional craftsmanship, timeless design, and unparalleled sound. Owning this piano is not only a privilege but also a connection to the rich history of Ludwig and Company. Whether you're a pianist, a collector, or an admirer of fine craftsmanship, this vintage instrument is sure to captivate your heart and soul just as much as it has ours!
]]>
This delectable treat combines the comforting taste of cinnamon rolls with the tartness of apples and the sweetness of caramel. The result? A flavor explosion that will make your taste buds dance with joy. When I first saw this recipe, it was a simple two ingredient dish but I decided to add a few extras to really make it super indulgent and delicious! As a side note, these pumpkin bowls were the perfect way to serve such a fun fall treat!
Now that I've got your taste bud stirring, let's dive into the recipe. Here's what you'll need:
1. Preheat your oven to 325°F and grease a baking dish.
2. Open the can of cinnamon rolls and set aside the icing for later.
3. Cut cinnamon roll dough into 6 pieces, repeating for each cinnamon roll.
4. Add cinnamon roll pieces to a lightly greased baking or pie pan.
5. Add Apple Pie Filling and stir.
6. Bake for 35 min (stirring half way to ensure cinnamon roll pieces bake evenly).
7. Top with toasted pecans, icing and caramel syrup.
8. Serve warm and enjoy!
Whether you're hosting a brunch, celebrating a special occasion, or simply treating yourself to a sweet indulgence, Caramel Apple Cinnamon Roll Bake is the perfect choice. So grab your apron, preheat your oven, and get ready to experience a dessert that will make you look like a dessert diva!
]]>
When it comes to creating a comfortable and stylish master bedroom, every detail matters. One often overlooked element is the ceiling fan. The Erling Fan from Hunter Fan Company is the ideal choice to enhance the ambiance and functionality of your master bedroom. Let's explore why this fan is a must-have addition to your space!
]]>I’ve always loved the look of a chandelier in a Master Bedroom and vowed I would have one when we added on our Master Suite. I love the look of the wood bead chandelier in our master bedroom but to be honest, I missed the comfort of a ceiling fan. Over the past year I’ve tried to find something to blend the beauty of the chandelier and the comfort and cooling power of a ceiling fan. It was definitely a long, hard search, but this Erling Fan from Hunter Fan Company was the perfect combination of beauty and function! One look at the luxe gold finish and gray oak blades and I was SOLD! I’m sharing a few more details about the fan in the rest of the blog post but feel free to reach out if you have an questions!
When it comes to creating a comfortable and stylish master bedroom, every detail matters. One often overlooked element is the ceiling fan. The Erling Fan from Hunter Fan Company is the ideal choice to enhance the ambiance and functionality of your master bedroom. Let's explore why this fan is a must-have addition to your space!
The Erling Fan is designed with cutting-edge technology to deliver exceptional performance and energy efficiency. With its powerful motor, this fan provides optimal air circulation, keeping your master bedroom cool and comfortable throughout the year. Hunter’s SureSpeed® Technology delivers airflow that you can really feel, making your room cool off quickly and keep it cool! Also, all Hunter Fan Company Fans are covered by a lifetime warranty.
One of the standout features of the Erling Fan is its whisper-quiet operation. You can enjoy a peaceful night's sleep without any disruptive noise from the fan. The advanced motor technology and precision-engineered blades make the Erling Fan virtually silent, allowing you to relax and unwind in your master bedroom without any distractions.
The Erling Fan boasts a sleek and stylish design that complements any master bedroom décor. Its modern aesthetic, combined with a variety of finish options, allows you to choose the perfect fan to match your personal style. Whether your master bedroom has a contemporary, traditional or vintage theme, the Erling Fan will effortlessly blend in and become a focal point of your space. I love the way it blended right in to my vintage style!
With the Erling Fan, convenience is at your fingertips. This fan comes with an optional handheld remote control, allowing you to adjust the fan speed, dim the lights, and set a timer without leaving the comfort of your bed. The Erling Fan also features a reversible motor, enabling you to switch between downdraft mode for cooling and updraft mode for circulating warm air during the colder months.
Transform your master bedroom into a haven of comfort and style with the Erling Fan from Hunter Fan Company. Its unmatched performance, whisper-quiet operation, sleek design, and convenient features make it the perfect addition to any master bedroom. Don't settle for an ordinary ceiling fan when you can have the Erling Fan to elevate your space to new heights of luxury!
Please note***This post contains affiliate links. If you make a purchase via one of these links I may receive a small commission from your purchase. This commission does not add any cost to you but helps me to continue to share new products, companies and ideas with you. Thank y'all for always being so supportive!!
]]>My youngest son is the little music prodigy of the family and I’ve been on the hunt for a vintage upright piano for years! When we scored a free piano on Facebook Marketplace I was beyond excited! (Sharing all about the piano in an upcoming post!)
Since we didn’t have a piano bench I began scouring Facebook Marketplace yet again and found this sweet, simple little bench. The lines and style were perfect for our piano however, the fabric and color just didn’t work well in our home.
I posted a poll on Instagram stories and many of you read my mind and voted to paint it black! I used Fusion Mineral Paint in the color Ash on the bench legs and frame.
Up next was fabric selection! I love how with a little creativity and some fabric, you can transform ordinary pieces into true beauties! Reupholstering a bench not only gives it a fresh new look but also allows you to add your personal touch! I found this fabric at Hobby Lobby and loved the simple pattern and color scheme. It also harmonizes well with the piano keys don’t you think? (Get ready for lots of music puns in this post!)
Once you’ve selected the finish and fabric it’s time to gather the rest of your supplies!
So now that we’ve gathered our supplies, let’s get started with the upholstery work!
First, start by removing the bench seat from the frame. Next, it’s time to get rid of the old fabric! My favorite tools are the RockSteel Staple Remover and a pair of Needle Nose Piers.
Carefully remove each staple using a slight rocking motion with the staple remover. Avoid rocking or putting too much force on the frame or seat. Since many of the pieces I reupholster are vintage, the staples often break when trying to remove them! That’s when the Needle Nose Pliers become life-savers!!! Use the pliers to grab and remove any staple fragments left in the frame.
Once the fabric is removed, keep it!! You will use this fabric as a template for the new fabric.
Next, lay the old fabric onto the new fabric as a template. Place the right side (outside) of the old fabric onto the wrong side (inside) of the new fabric.
Cut the new fabric using the old fabric as a template leaving an additional 1-1.5” around the old fabric.
If the bench seat batting is worn or needs replacing now is the time to do it using new batting and spray glue. My batting was in decent shape on this piece so I didn’t replace it. (If you have any questions about that feel free to reach out!)
Next, lay the bench seat onto the wrong side (inside) of the new fabric. Once the bench seat and fabric are lined up, begin stapling! I use a pneumatic upholstery stapler that I’ve had for over 10 years now but a simple staple gun works just as well for small projects.
Start on the long horizontal pieces. Pull the fabric taught and add a staple right in the center on each side. Repeat the process on the short vertical sides adding one staple in the center. This secures your fabric but still allows movement for corners and lining up patterns.
Next, tackle those corners! I used to dread corners so much but after a few projects I learned to just do my best and enjoy the beauty in imperfection! For a simple look on a square corner, pull the center of the fabric to the center of the bench then overlay the fabric on top lining up the pattern if needed.
Staple the center fabric in place with multiple staples while pulling the fabric taught to avoid any wrinkles or puckers in the fabric.
Repeat pulling the fabric taught and stapling on the outside piece. Continue this process over the entire surface of the bench until the fabric is secure.
Finally, reattach the seat and enjoy your new masterpiece!!
If you’d like to see a short video of the process on Instagram you can check it out here. I would love to see your reupholstered creations! Please tag me on social media or send me an email with some before and after! Happy Upholstering friends!
Please note***This post contains affiliate links. If you make a purchase via one of these links I may receive a small commission from your purchase. This commission does not add any cost to you but helps me to continue to share new products, companies and ideas with you. Thank y'all for always being so supportive!!
]]>
So, you've got a piece of furniture that's seen better days. The finish is worn, the color is faded, and it's just not bringing you joy anymore. Fear not, my friend, because I've got a solution that will have your furniture looking brand spanking new in no time. And the best part? It involves a pressure washer. Yes, you read that right. We're going to strip the finish off of your furniture with the power of water. Let's dive in!
This Is a before view of the bed frame. The 1980 are calling and they want their bed back right?!?
Before we get started, you'll need to make sure you have the right tool for the job. Not all pressure washers are created equal, so be sure to choose one with enough power to strip away the finish without damaging the wood underneath. Look for a pressure washer with an adjustable nozzle and a PSI of at least 1500. Trust me, you'll thank me later. For this project, I used a 3000 psi power washer with a 15 degree nozzle.
Now that you've got your pressure washer ready to go, it's time to set up your workspace. Find a well-ventilated area, preferably outdoors, and lay down a tarp or drop cloth to catch any debris or paint chips that may come off during the process. You don't want to make a mess, do you? Of course not!
Before you start blasting away, it's important to protect yourself. Put on some safety goggles to shield your eyes from any flying debris, and don't forget to wear gloves to keep your hands safe from the powerful spray. Safety first, my friend!
Let’s get the goopy gloppy party started! Since I was in a rush to get this project done, I used Citristrip from Home Depot. There are many other options for strippers including QCS and GreenEz. I’ve heard great things about both and plan on using them for future projects but I was in a major time crunch for this project (like 1 day to finish the entire thing!) so I used what I could find locally. I applied a generous coat of stripper and let it set for ~15 min.
Now comes the fun part. Fire up that pressure washer and start spraying the furniture, focusing on one section at a time. Move the nozzle back and forth in a sweeping motion, making sure to keep it at a safe distance from the surface to avoid any damage. The water will strip away the finish, revealing the beautiful wood underneath. It's like magic!
After rinsing and allowing the piece to dry for several hours, apply another coat of stripper as needed. My piece had a very thick polyurethane finish so 2 coats were needed. Once you've stripped away the finish from the entire piece of furniture, it's time to give it a good rinse. Switch to a wider spray pattern on your pressure washer and go over the entire surface, removing any remaining debris or paint chips. Take a step back and admire your handiwork. Doesn't it look amazing?
Sanding may be required for those stubborn areas that just won’t let go of the finish!! Use 120 grit sand paper or if sanding a chair or bed with spindles you can sand like to boss with these brushes attached to a drill! Please everyone…learn from my mistakes!! After sanding, give the piece a thorough wipe down with a damp cloth to remove excess dust.
After all that hard work, you'll want to let your furniture dry completely before applying a new finish. Give it a day or two to air dry, and then you can get creative with your choice of stain, paint, or sealant. The possibilities are endless!
If you’re leaving the wood unfinished with a raw look, i recommend this wax. It will darken the piece slightly but overall keeps the natural wood look!
And there you have it, my friend. A quirky, fun, and slightly unconventional way to strip the finish off of your furniture. So, grab that pressure washer and get to work. Your furniture will thank you!
If you’d like to see a short video of the process on Instagram you can check it out here. I would love to see your pressure washed creations! Please tag me on social media or send me an email with some before and after! Happy Pressure Washing friends!
Please note***This post contains affiliate links. If you make a purchase via one of these links I may receive a small commission from your purchase. This commission does not add any cost to you but helps me to continue to share new products, companies and ideas with you. Thank y'all for always being so supportive!!
]]>
Before we dive into the recipe, let's take a moment to appreciate what makes Southern Banana Pudding so unique. It's not just any ordinary pudding; it's a heavenly concoction that brings together the flavors of ripe bananas, velvety pudding, and crunchy vanilla wafers. Each bite is like a symphony of textures and tastes, creating a dessert experience that is simply unforgettable.
Growing up in the South, banana pudding was a Summertime staple! I have so many good memories anytime I hear the name of this simple little dessert! I remember savoring each bite after we waited what felt like hours for the pudding to set! My mom would make the pudding in small individual dessert Tupperware containers that I thought were so cute! Instead of Tupperware I decided to kick things up a notch and serve them in champagne coupes!! Ultimate mocktail right?!
As a mom, I now know why my mother and grandmothers had this as one of their "go to" recipes! It's quick, cheap and delicious! My holy trinity for recipes :) And you just can't go wrong with pudding and cookies!
Adding a few extra ingredients to this basic instant banana pudding, gives new life to a traditional Southern favorite!! It's sure to make you look like a Southern dessert diva!
Now that I've built up your anticipation, let's gather the ingredients for this banana pudding. You'll need:
1 (5.1 oz) package of Jello Banana Cream Instant Pudding Mix
2 1/2 cups Cold Milk
16 oz Coolwhip
8 oz Cream Cheese (room temperature)
3-4 bananas depending on size
2 (11 oz) boxes of Vanilla Wafers
*Click here for a shoppable ingredients list.
Now that we have all the ingredients, it's time to start the banana pudding magic. Follow these simple steps:
1. In a large mixing bowl, add 2 1/2 cups cold mild to the pudding mix and whisk or mix on low in a stand mixer for 2-3 minutes.
2. Mix 8oz Coolwhip (1/2 of the container) and cream cheese into the pudding on medium setting for an additional 2-3 minutes or until smooth and combined using a stand or hand mixer. Reserve the rest of the Coolwhip for the topping.
Z
3. Slice bananas.
4. Layer the final ingredients into a large serving bowl or trifle bowl beginning with the vanilla wafers then adding the pudding mixture on top. Add additional layers to the desired amount and thickness of your choice. (I only added 2 layers based on my families preference but let your layering heart run wild!). End the layering with vanilla wafers on top.
5. Add a layer of Coolwhip over the top.
6. Crumble vanilla wafers and sprinkle over top of Coolwhip. You can also add sliced bananas and/or whole cookies for garnishing.
7. Chill in refrigerator for 1 - 2 hours.
8. Serve in dessert bowls or champagne coupes for an extra touch! Why not go all out?!!?
Now that your Southern Banana Pudding masterpiece is complete, it's time to gather your loved ones and get ready for a banana pudding party. Take a moment to appreciate the creamy layers, the sweet bananas, and the crunchy wafers. Each spoonful is a little taste of heaven that will transport you to the sunny South.
So go ahead, grab a spoon, and dig into this delightful dessert. Just be prepared for the explosion of flavors and the chorus of "mmms" and "ahhhs" that will fill the room. Southern Banana Pudding is not just a dessert; it's a celebration of all things sweet, creamy, and utterly delicious.
If you want to see the process step by step in a short video, you can click here for the Instagram Reel. You can also Pin or save the recipe graphic below.
You can Click Here to shop all of the supplies and decor I used to create this fun Tablescape!
Hope you enjoy this recipe as much as my family and I have! I’d love to hear from you via email, social media DM or tag me in your posts!
Please note***This post contains affiliate links. If you make a purchase via one of these links I may receive a small commission from your purchase. This commission does not add any cost to you but helps me to continue to share new products, companies and ideas with you. Thank y'all for always being so supportive!!
]]>
I’ve had the idea of a gallery wall on this living room wall for what feels like forever!! I started collecting frames for this project (and a gallery wall for the bathroom coming soon!) last Christmas and have slowly but surely curated some really great frames and even a few vintage art pieces.
One thing I’ve learned the hard way when buying vintage frames is to have a tape measure handy! Many vintage frames were custom made for the art piece and can be very weird sizes when trying to add new art to them. To make things easy, I like to look for frames with standard size openings. With that said, if I’m really in love with the frame, I will just cut the art to fit the custom size.
To select the layout, I chose the frames I would work the best and then laid them on the floor trying different arrangements. These are the three options I liked the best.
Option A
Option B
Option C
I put poll up on Instagram stories and Option A was the overwhelming winner! That’s the arrangement I actually liked the best too! I swapped out the white frame for a gold one but otherwise kept the layout the same.
The solid pine reverse board and batten in our living room did make the gallery wall a challenge when selecting the frame sizes. Because of the spacing and thickness of the boards I wasn’t able to use any small frames (like 5x7) without having lots of dead space. I do have some ideas about how to get around that problem and I’ll share more about that soon!
Two of the pieces (upper left and upper center) are vintage and the rest are reproductions. The top left piece of art is a Vintage French Lithograp I stumbled on while thrifting! It’s dated 1875 and I’m trying to research more about it. I’ll keep you posted if I find out anything interesting!
The rest of the art is printed from high resolution digital reproductions I purchased on Etsy and printed at Walgreen’s. If you’d like to read more about the process, I have an entire blog post with source links for you here.
To finish off the space, I added some cozy candles in vintage brass candlesticks, a few of my favorite books and other neutral decor pieces to my grandparent’s repainted dresser. For a little extra softness and pattern, I added few of our Linen Layering Pillow Covers and throws on my thrifted wing back chairs. If you’d like to shop this look I have all of the shoppable links on my LTK account you can check out here.
After having patriotic decor out for the beginning of Summer, I’m loving the calming neutral vibes! But of course I’m already thinking about some easy changes I can make to transition to Fall!
Please note***This post contains affiliate links. If you make a purchase via one of these links I may receive a small commission from your purchase. This commission does not add any cost to you but helps me to continue to share new products, companies and ideas with you. Thank y'all for always being so supportive!!
]]>
For our last turn to host our Bible Study, I was searching for something different. I always feel like I bake the same things over and over! How about you? When I mentioned my delimma to my coworkers, my friend Megan offered up this recipe and it could not have been a bigger hit!! These mini fruit tarts are light, creamy and so easy to customize for any season or party theme! So today I'm sharing Megan's Mini Tarts for all of you to enjoy!
I N G R E D I E N T S :
1 Package of 24 precut Sugar Cookies
16 oz Coolwhip
8 oz Cream Cheese
1 Cup Confectioners’ Sugar
1/2 Cup Strawberries (chopped)
1/3 Cup Blueberries
D I R E C T I O N S :
1. Preheat Oven to 350 degrees.
2. Cut cookie dough into halves.
3. Add cookie dough halves into greased mini muffin pan.
4. Bake on 350 degrees for 6 - 8 minutes. Cookies will be slightly undercooked.
5. Compress the middle of the cookies with a tart tamper and allow to cool.
6. Combine Coolwhip, Cream Cheese and Confectioners’ Sugar in mixer on medium speed. Add mixture to a pastry bag or ziplock bag with one end cut.
7. Fill Mini Tarts with filling and top with fresh fruit.
8. Chill in refrigerator for approx 1 - 2 hours to allow the filling to set.
If you want to see the process step by step in a short video, you can click here for the Instagram Reel. You can also Pin or save the recipe graphic below.
Special thanks to Megan for sharing this super yummy recipe! And Marie for suggesting I ask Megan :)
Hope you enjoy this recipe as much as my family and I have! I’d love to hear from you via email, social media DM or tag me in your posts!
]]>
I’ve wanted a bed swing for as long as they’ve been around but the timing just wasn’t right with all of our temporary living situations over the past few years. When we discussed plans for the front porch makeover, a bed swing was at the very TOP of my list! Based on the size of our porch and research that I’ve done, a crib mattress size swing seemed like the best option for our space so this tutorial is designed to fit a standard 52” crib size mattress. You can definitely alter the dimension to fit any size mattress or cushions to suit your space!
The tutorial is for an X style design which does require a little extra work and additional cuts but we really wanted to keep the X design to mirror the style of the porch railings.
S U P P L I E S :
P R O C E S S :
BUILD THE TWO SIDES:
BUILD THE BACK:
BUILD THE BASE:
ATTACH THE SIDES TO THE BOTTOM:
STAIN OR PAINT
ATTACH THE ROPE:
SECURING THE SWING:
Want to see a video of the process. Click here for the YouTube video of the swing build.
]]>
I love using dried moss for Spring and Summer! It adds so much texture and subtle, neutral color so I’m always looking for ways to incorporate it! I’ll take you step by step through the easy process of turning a simple clear glass vase into a statement piece!
S U P P L I E S :
P R O C E S S :
First, open the sheet of moss and spread evenly, opening any folded pieces. There is always a “green” side that should be used on the outside of projects and a “brown” side which i consider to be the back of the moss.
Next use the glue gun to add glue to the back of a section of the moss. Then add E6000 glue directly onto the vase. From previous experience, glue from a glue gun does not hold up well over time on glass and can easily be removed. I recommend using the glue gun to hold the moss in place while the E6000 glue dries and has a more permanent adherence.
After applying the glue, place the section of moss directly onto the vase pressing firmly with your hand and shaping as needed. Repeat the process until the entire vase is covered.
Since the moss is only on the outside of the vase, you can still fill it with water for fresh flowers!
I created a short video of the process on Instagram that you can watch by clicking here. I’d love to see your creations, so please tag me on social media or send me a message!
]]>
After I was diagnosed with a health problem in 2014, I began to look at everything going into and onto my body and in my environment. I was so shocked at how many chemicals my family and I were being exposed to and spending lots of money in the process! I made a radical change (that's a long story for another time ha!ha!) and in the process found Dr. Bronner’s products.
Dr. Bronner’s Pure-Castile Liquid Soap is organic, biodegradable and ethically sourced. This quick recipe is an adaptation of the All-Purpose Cleaning Spray on their website which contains 2 simple ingredients…water and Dr. Bronner’s Castile Soap! That’s it!
S U P P L I E S :
D I R E C T I O N S :
This cleaner is super easy to put together and quick to refill! Simply fill the spray bottle with water ~3/4 full then add 2 tablespoons of Dr. Bronner’s Castile Soap directly into the spray bottle. Add additional water to fill up the spray bottle and begin cleaning!
So easy right?!? And at a fraction of the cost of all of the chemical filled cleaners on the market! One 32 oz bottle of Dr. Bronner's can easily last 6 months or up to a year depending on the amount of use.
To prevent a film on shiny surfaces, like my countertops, I use filtered water (we have an external water filter and a reverse osmosis system for drinking). For the tutorial I used Dr. Bronner's Rose Scented Castile Soap but I also love Peppermint! The soaps have a very light scent and come in a wide variety of scents. You can check out all of the scents and uses here on the Dr. Bronner’s website.
I’ve made a quick video of the process for Instagram that you can watch by clicking here and can shop all of the supplies shown in my pictures on my LiketoKnowIt Account by clicking here.
I’d love to hear your feedback so please reach out or tag me on social media! Happy Spring Cleaning!
]]>
S U P P L I E S :
P R O C E S S :
The process is super simple and basically the same as the Decoupage Eggs I shared. If you’d like to read more about those, you can click here.
First fold the card stock in half then in half again.
Use the fold lines as a template to cut the card stock into 4 pieces the use the card stock as a template to cut out book pages or scrapbook paper.
Apply an even amount of Mod Podge to the card stock then place the book page over the card stock.
Apply another layer of Mod Podge on top of the book page. Add dried flowers then cover the dried flowers with another layer of Mod Podge.
Place pieces on wax paper and allow to dry for several hours.
Once dry to the touch, use the mini clothes pins to attach to the twill tape or jute twine and space evenly. I used 11 pieces on my garland and then used an additional one on the mantel.
Add bows on each end and enjoy your custom garland! These are so easy and fun to make! The possibilities and color combos are endless!!
I Iove the way these turned out and I hope you do too! Please be sure to tag me on social media or send me a message if you try these! I’d love to see your creations!! I have a short video tutorial on Instagram you can check out here.
]]>
The baskets used in our listing photos on our website and Etsy shop are actually Easter baskets from our twin sons first Easter almost 21 years ago!! These are from Pottery Barn and no longer available but have withstood the test of time (and twin boys!)
Our basket liners are designed to accommodate round baskets up to 15.5” in diameter and 8” deep. The liners can be tucked into the basket and ties adjusted for smaller baskets.
There are multiple sources for baskets but I’ve listed a few of the most popular and at different price points for you below.
The updated version of these Pottery Barn baskets looks a little different but the liners are still compatible with the small and large versions.
The photo below shows the 12” Target Basket with our Natural (Cream) Liner. We do have a “No Text” option to purchase the liner without personalization!
There are obviously multiple other options for Easter Baskets out there but these baskets are the closest to the ones shown in our listing pictures and have multiple price point options for any budget!
We’d love to see photos of your basket liners! Tag us on social media and you can follow our shop’s latest updates on Instagram @returninggrace
Please feel free to reach out and let us know if we can help with anything else!
]]>
I’ve always wanted to try decoupage eggs but all of the techniques in tutorials I’ve seen using napkins recommended cutting out the image before decoupaging and that just seemed a little tedious to me! In addition, I couldn’t quite find the right patterns or colors so when I saw this tissue paper at Hobby Lobby I was determined to give it a try!
If you have basic craft supplies on hand, this project can be completed for under $5 per dozen! Beautiful and budget friendly?!?! Let’s get started!
S U P P L I E S :
P R O C E S S :
CUT TISSUE PAPER
First, cut out pieces of tissue paper. I cut an egg shaped piece about double the size of the egg.
Next, use this piece as a template to cut out the rest of the pieces. If using this size and shape, you will need 2 pieces of tissue paper per egg.
After cutting out the pieces of tissue paper, you’re ready to decoupage! I recommend wearing gloves when you decoupage, it makes clean up a lot easier!
APPLY DECOUPAGE
First add a thin layer of Mod Podge to one half of the egg from the top to bottom.
Next, apply one piece of cut tissue paper over the area and flatten against the egg with your fingers.
You can gently shape the tissue paper and cut extra tissue paper off as needed. Then apply another layer of Mod Podge over the entire surface, sealing the tissue paper in place.
Repeat the process with the second piece of tissue paper covering the entire surface of the egg.
DRY EGGS
Once a thin coat of Mod Podge has been applied over the entire surface, place the eggs on wax paper to dry.
After a few hours, the eggs should be dry and ready to style in your Easter decor!
I Iove the way these turned out and I hope you do too! Please be sure to tag me on social media or send me a message if you try these! I’d love to see your creations!! I have a short video of the process here on Instagram and here on Youtube.
Happy Easter Crafting!!
]]>
I love dried florals and have been trying to figure out how to use them in my decor for quite a while! Spring just seemed like the perfect time and what better way than on Easter Eggs!
I’m not a huge fan of the store bought fake eggs so this year I’m determined to add a few special touches to make them my own so hang on…it’s going be egg overload over here! Hahaha!
S U P P L I E S:
P R O C E S S:
First apply a thin layer of ModPoge over the surface of the egg where you intend to apply the flower onto. It’s best to work in small sections to prevent the ModPodge from drying too quickly.
Next apply the flower using tweezers. These flowers are super delicate so be gentle! If there is a stem or other area of the flower that is not molding to the shape of the egg, apply gentle pressure with the tweezers and hold for a few seconds to give the decoupage time to adhere. You can repeat this process as needed until the glue is dried, going back to those stems or other areas to ensure they’re secure.
After securing the flower, apply an additional layer of ModPodge over the flower and egg. Let your creativity flow and repeat this process until you’ve achieved the look you want! All of my eggs are different and I mixed colors and flowers with greens…the possibilities are really endless!
The flat bottom eggs make is super easy to stand the egg up on a flat surface to dry. Allow the eggs to dry for a few hours and then enjoy in your Easter Decor!! Even after making 6 of these eggs, I had tons of flowers left and I can’t wait to share the next dried floral craft with y’all!!
I Iove the way these turned out and I hope you do too! Please be sure to tag me on social media or send me a message if you try these! I’d love to see your creations!! I have a short video tutorial with text here on Youtube and another video on Instagram you can check out here.
Lots more Spring and Easter Crafts to share so stay tuned!
]]>